Patching & the DMX Map
In This Article
The DMX Map
The DMX Map is where fixtures are added to a project, patched to a Connection, and managed.
The center shows a scrollable list of all Connections, the address space available, and the fixtures patched within. An interactive mini-map of all Connections is on the right side for easy navigation, and a quick way to find open address space. The DMX Map can be zoomed out by pinching the map, or using the zoom buttons above the mini-map.

Commit (Save)
Changes made to the DMX Map do not go into effect until 'Commit' is pressed. To scrap the pending changes, tap 'Revert' instead. Changes to the DMX Map must be committed or reverted before navigating away from the DMX Map.
Fixture Details Panel
Selecting a single fixture and tapping 'Edit' in the action bar will open the Fixture Details panel. Choosing 'Edit' from the three dots menu of a fixture will also open the Fixture Details panel. The top of this panel shows the manufacturer, fixture model, and profile for the fixture. Below that are several editable properties that include:
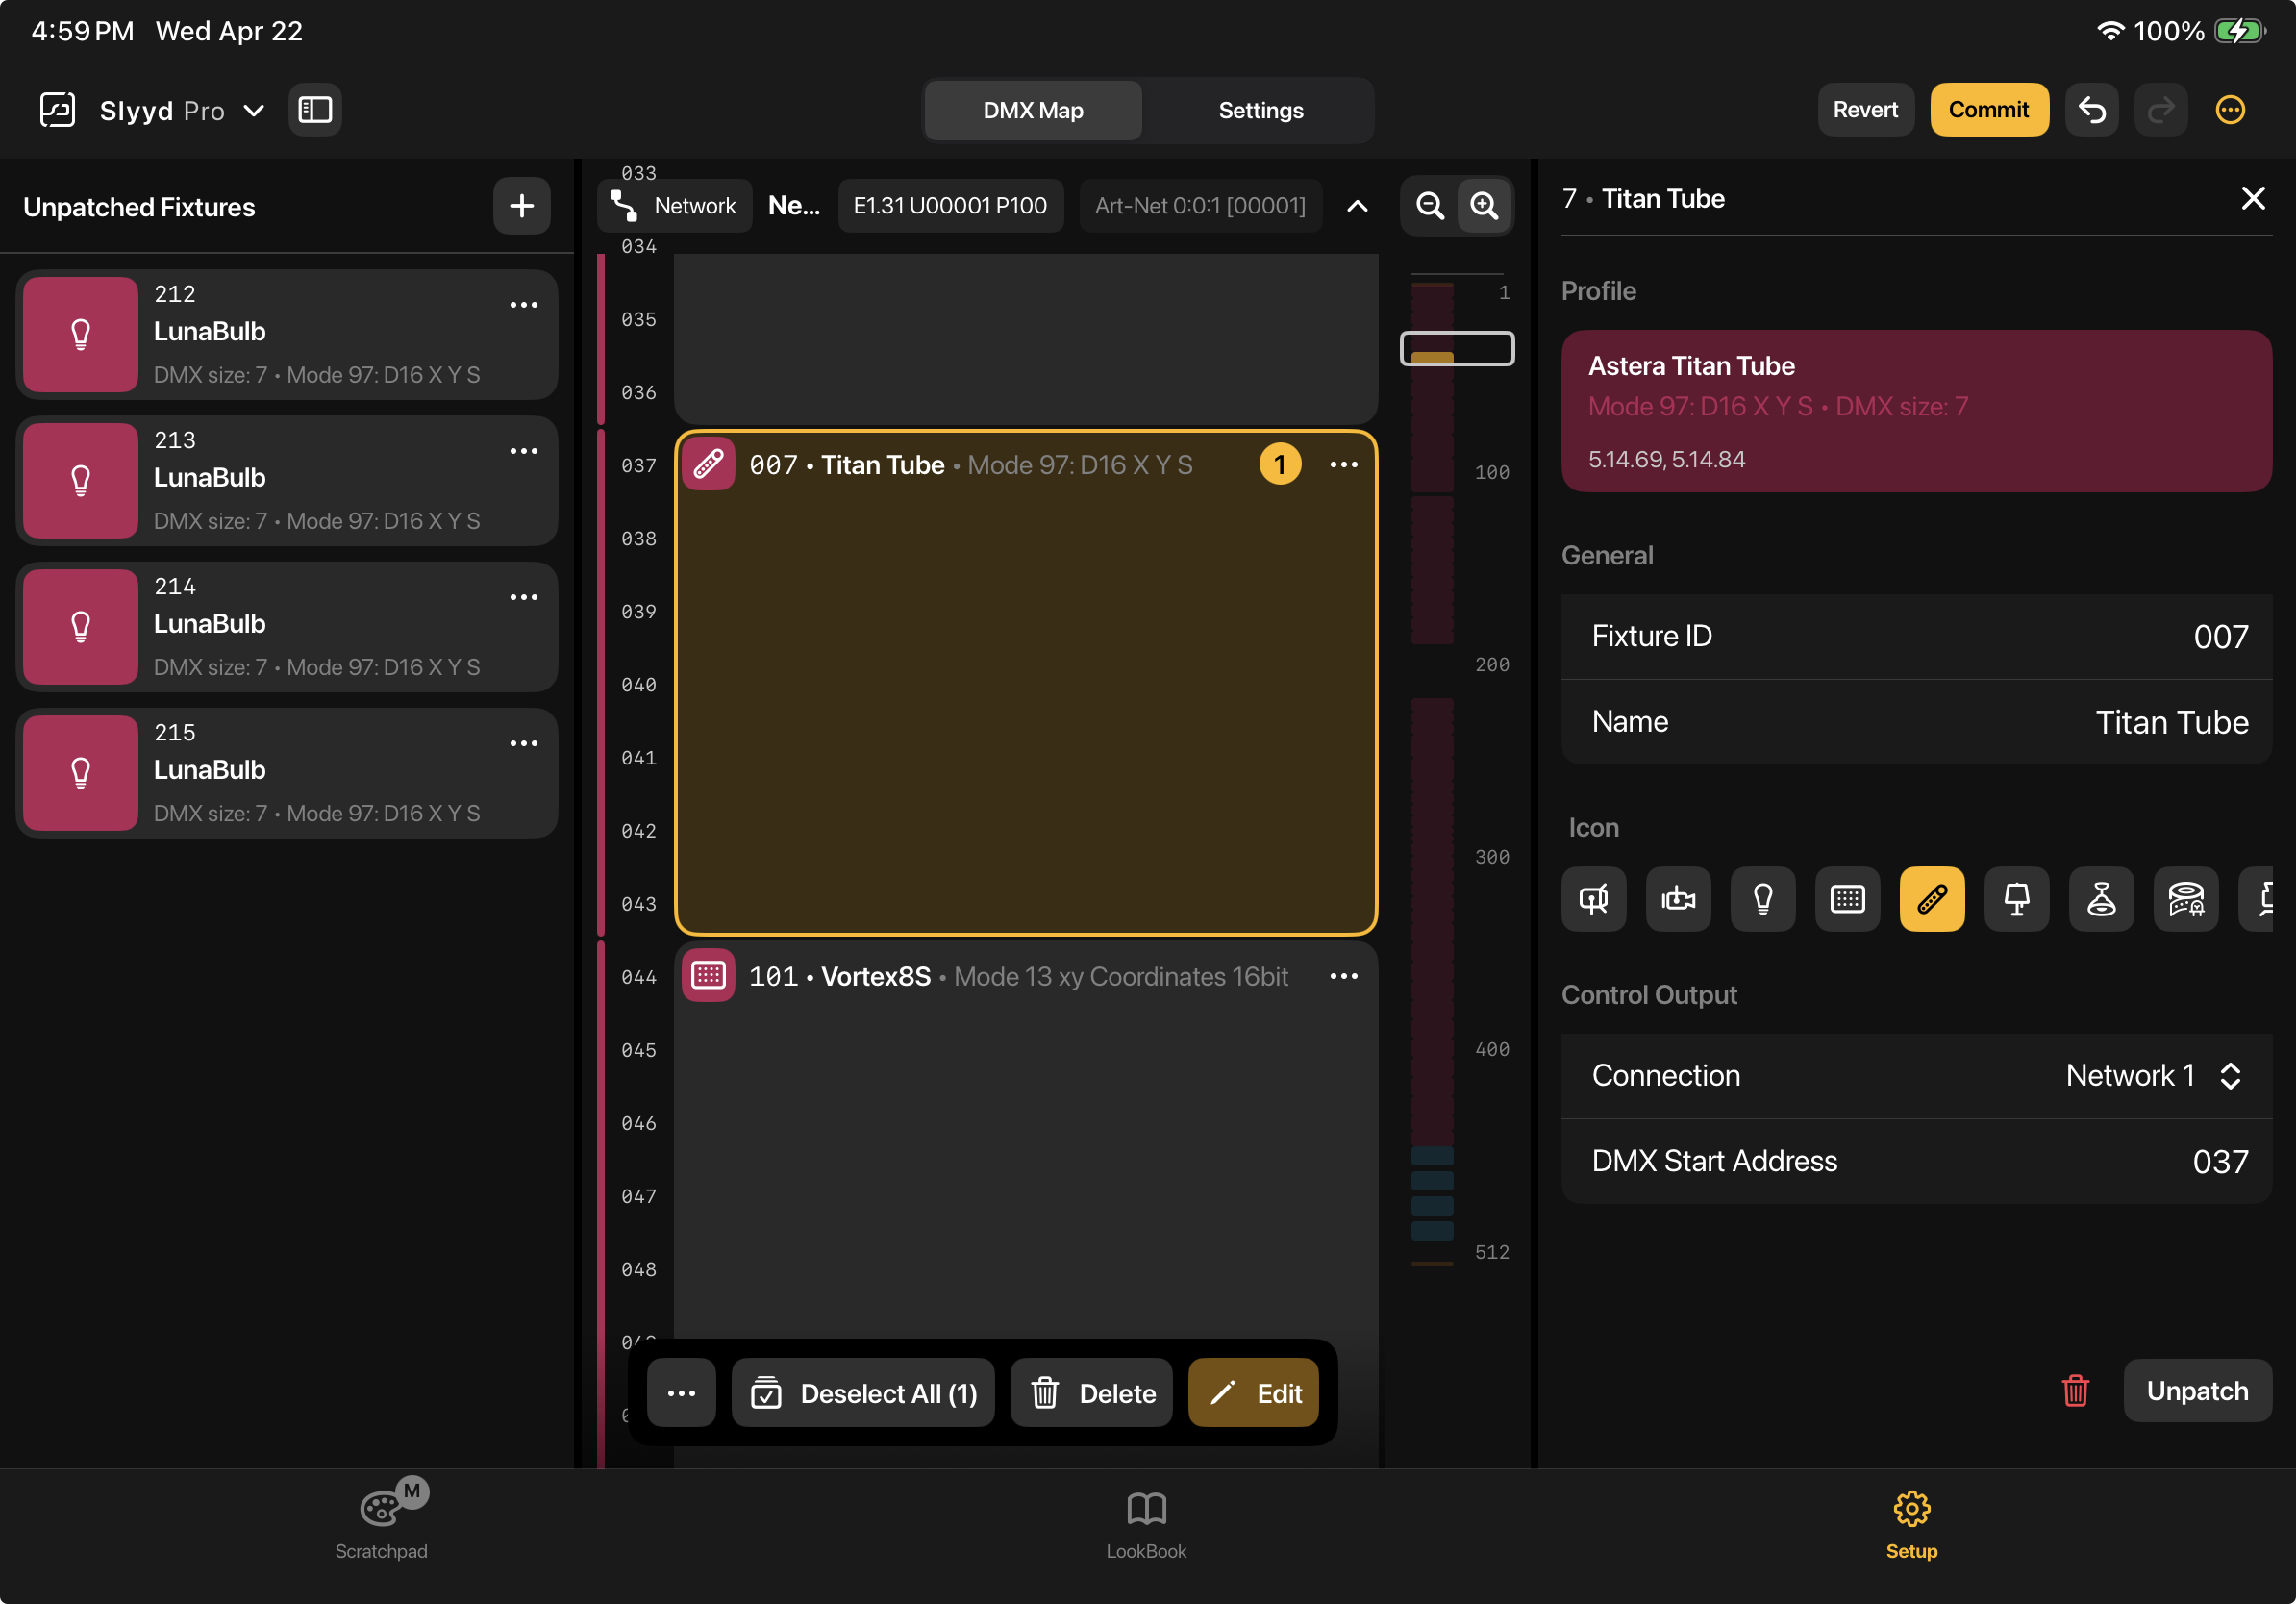
Fixture ID- A numerical name for the fixture, similar to a fixture’s channel number in other lighting software. Fixtures are sorted by Fixture ID on the Scratchpad. No two fixtures can have the same ID.
Name - A fixture name can be anything to help remember the fixture’s purpose. Multiple fixtures can have the same name, which can help with organization. By default, the name is populated with the fixture model when adding new fixtures.
Icon - An Icon that represents the fixture on the Scratchpad and in Looks. The choice has no function outside of being a quick visual reminder, so feel free to select any icon.
Connection - The Connection the fixture is patched to. Each connection contains 1 universe of DMX data. Connections are created on the Settings tab of the Setup screen. More information on Connections is available in the Project Settings and App Settings article.
DMX Start Address - The starting address the fixture is patched to. The start address can be changed numerically here, or by dragging and dropping on the DMX Map, or using Multi Patch.
Unpatched Fixtures Panel
The Unpatched Fixtures panel is where newly added fixtures show up before they are patched into the project, and where existing fixtures are staged when they are not in use. Placing a fixture in the Unpatched panel preserves all Look data for the fixture but removes it from Slyyd’s DMX output. This is particularly useful when it is necessary to temporarily free up address space in a Connection for new fixtures by unpatching fixtures not currently in use.

Fixtures can be moved to the Unpatched panel by dragging and dropping from the DMX Map, by selecting the “Unpatch” button within the Fixture Details, by choosing the “Unpatch” option from the three dots menu on a patched fixture, or by selecting multiple fixtures and using the 'Unpatch' button on the action bar.
Fixtures can be patched by dragging and dropping from the Unpatched panel, or by selecting “Edit” from the three dots menu and entering a Connection and a DMX start address on the Fixture Details panel.
Multi Actions
Multiple fixtures can be edited, deleted, patched, and unpatched at the same time, based on the order they were selected in. The first step to manipulating multiple fixtures it to create a selection.
Selection
Selection order is remembered when selecting fixtures, and is used later when making changes to multiple fixtures at once. The current selection order is designated by a yellow circle with a number inside on selected fixtures.
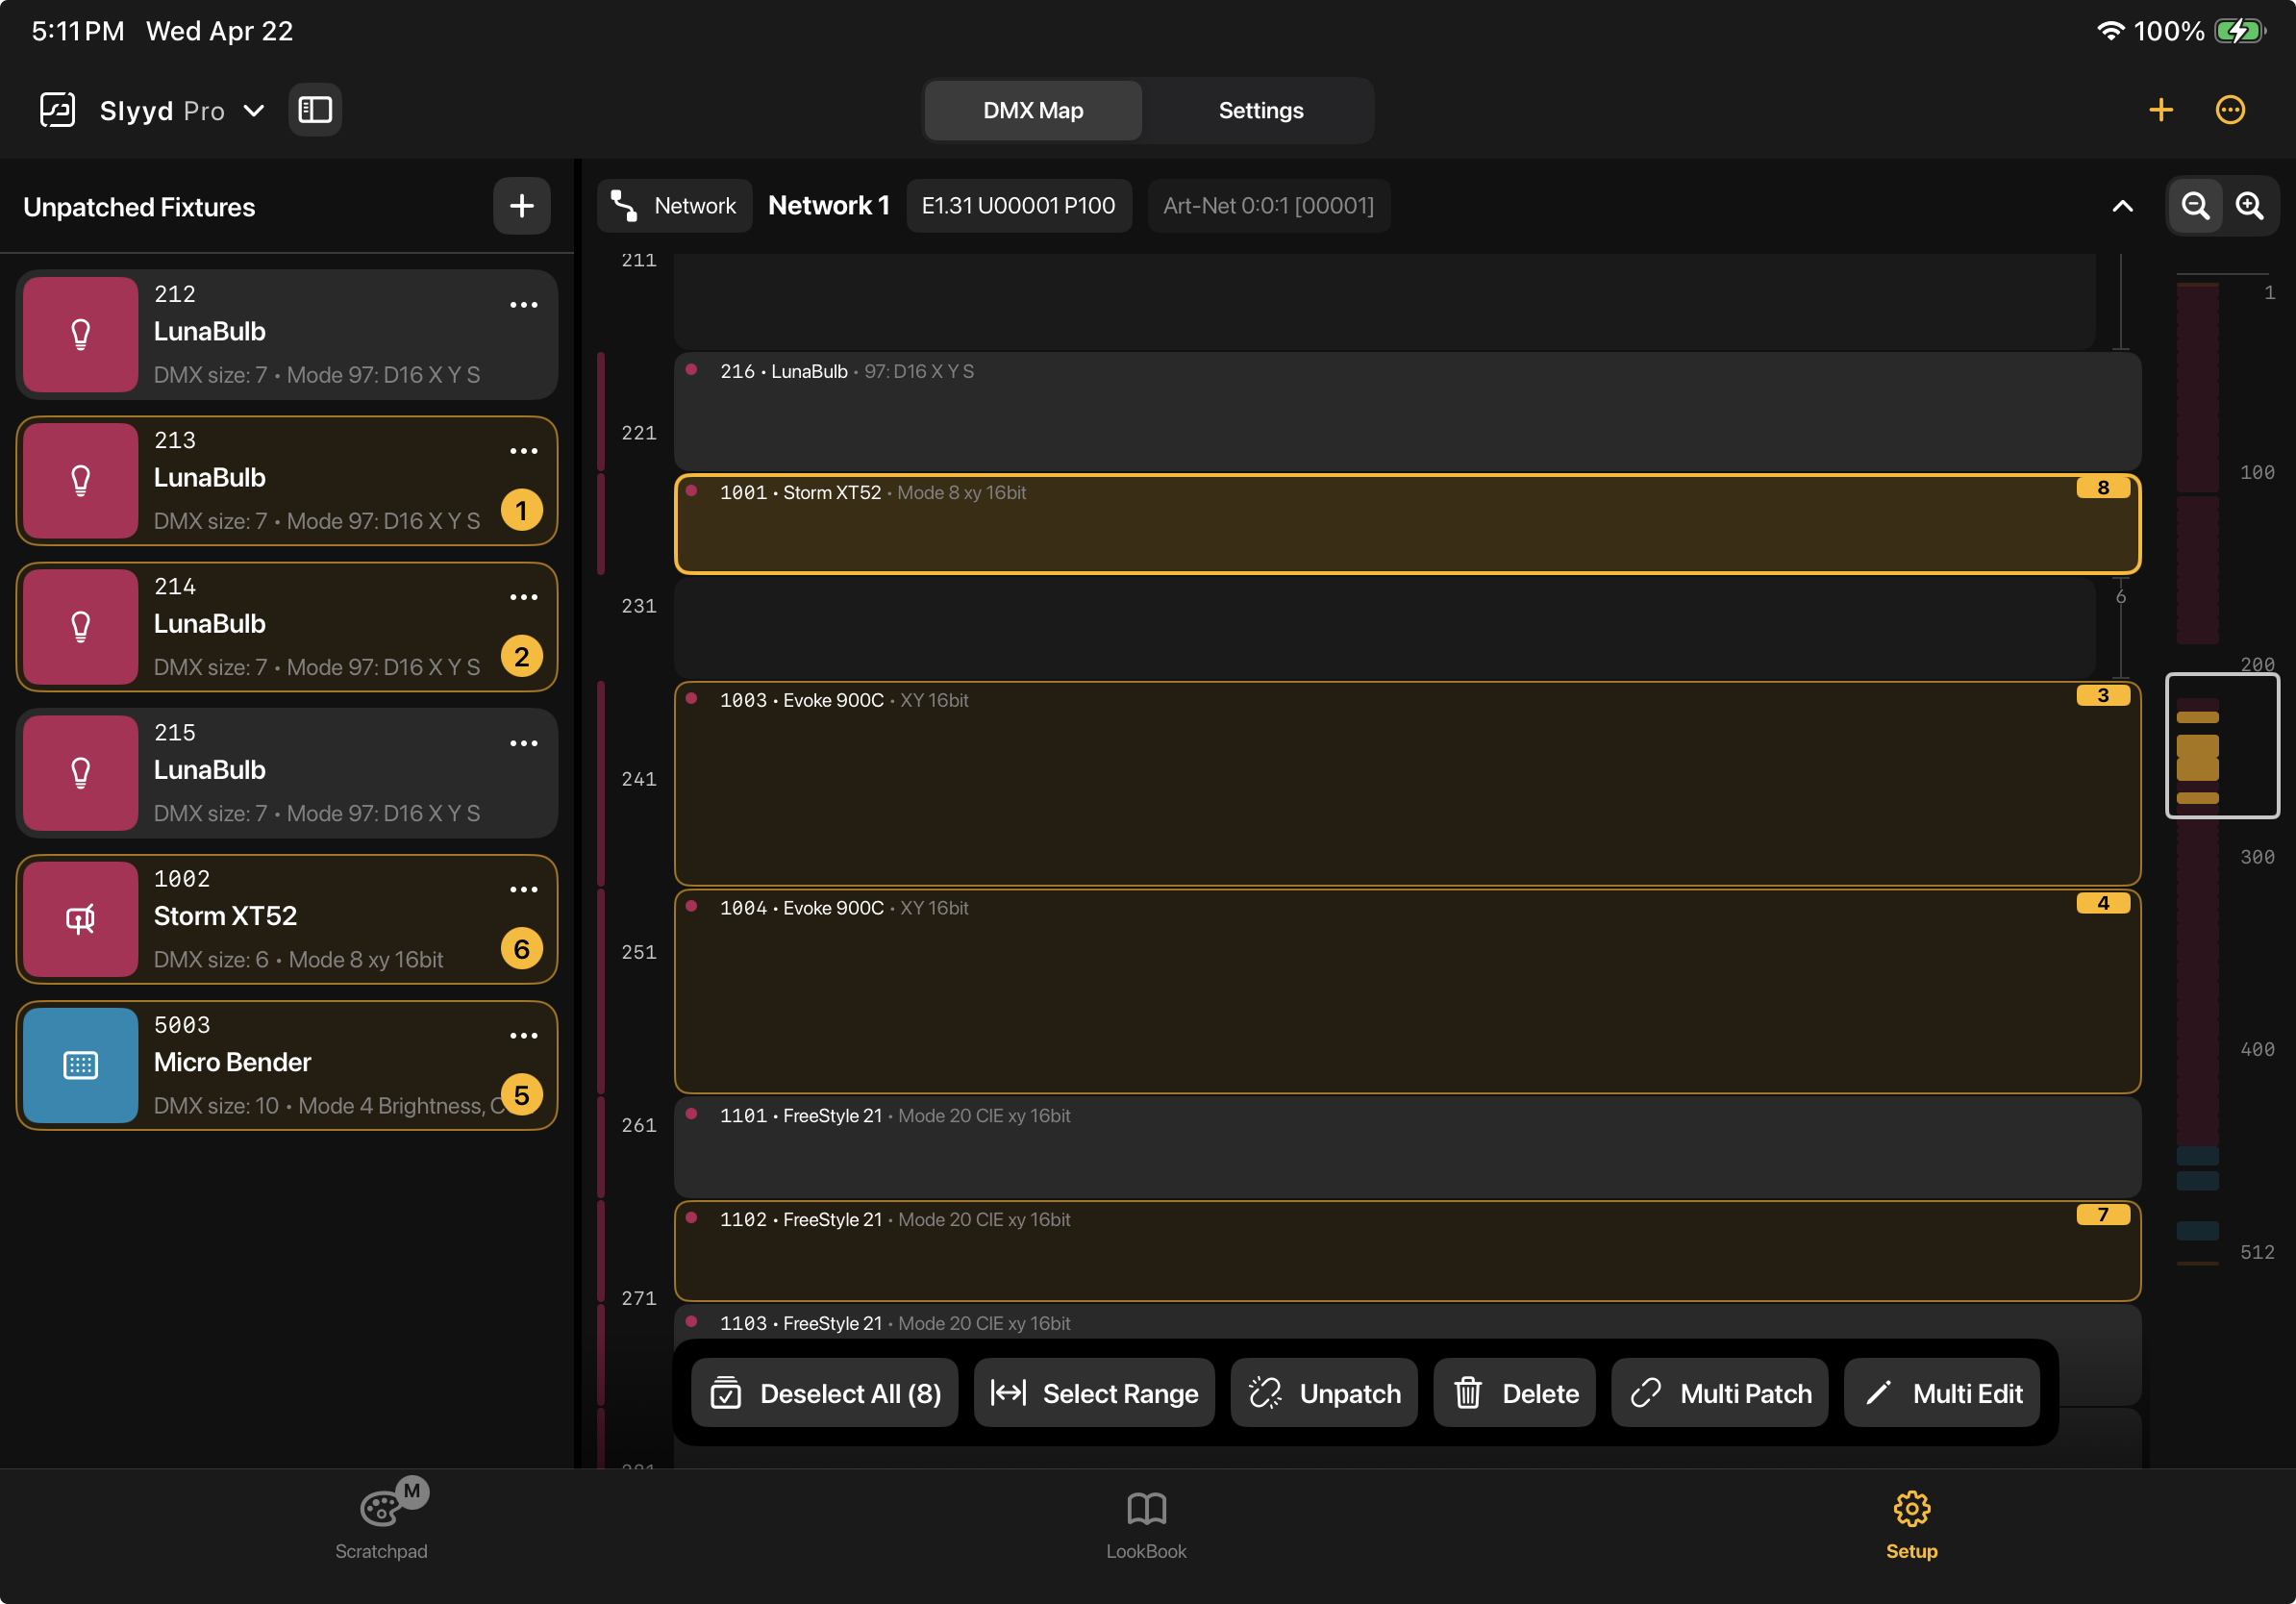
Patched and Unpatched fixtures can be selected three different ways:
Tapping - Tapping adds or removes an individual fixture to the selection. Tapping and holding deselects everything else and selects only the held fixture.
Select Range - Turn Select Range mode on by tapping the 'Select Range' button in the action bar. Tapping an unselected fixture when Select Range mode is on selects it, and sets it as the range start fixture, marked with the range start icon. Tapping another unselected fixtures sets the range end and selects all fixtures in-between. The range start fixture is then cleared, and a new range start fixture can be selected. - Ranges of patched and unpatched fixtures can be selected, but selecting a patched fixture as the range start must have a patched fixture as the range end, and the same goes for unpatched fixtures.- Selection order of ranges follows the vertical order of the fixtures, and respects whether fixtures were selected high to low, or low to high.
Select All/Deselect All - Using 'Select All' selects all patched fixtures. It does not select any unpatched fixtures. 'Deselect All' deselects both patched and unpatched fixtures.
Multi Edit
Tapping 'Multi Edit' in the action bar when more than one fixture is selected opens up the Multi Edit panel. Changes made here are applied to all selected fixtures, based on the selection order. The following fields can be changed:

Fixture ID - Sequentially updates the Fixture ID of all selected fixtures, with the first fixture in the selection order receiving the new ID, the second fixture receiving the new ID + 1, and so on.
Name - Sets all selected fixtures to the newly input name. If the name includes a number that's not touching any letters, that number becomes tokenized after pressing return. The tokenized number increases by 1 for each selected fixture, following the selection order. If the name includes more than one number, only the number furthest to the right is tokenized. Tapping the 'x' on the tokenized number dismisses the tokenization, and instead applies the same number to all selected fixtures.
Icon - Sets all selected fixtures to the selected icon.
Delete - Deletes all selected fixtures. Also available on the action bar.
Unpatch - Unpatches all selected fixtures. Also available on the action bar.
Multi Patch
Tapping 'Multi Patch' on the action bar with multiple fixtures selected brings up the Multi Patch panel. All selected patched and unpatched fixtures are moved to this panel, and ordered according to the selection order. The selected fixtures will be patched sequentially in this order, in the selected Connection, starting at the chosen starting address. By default, the lowest Connection and starting address that can fit the entire selection is chosen, but these fields can be adjusted. A spacing value can also be given, that inserts the chosen amount of empty addresses between each fixture.
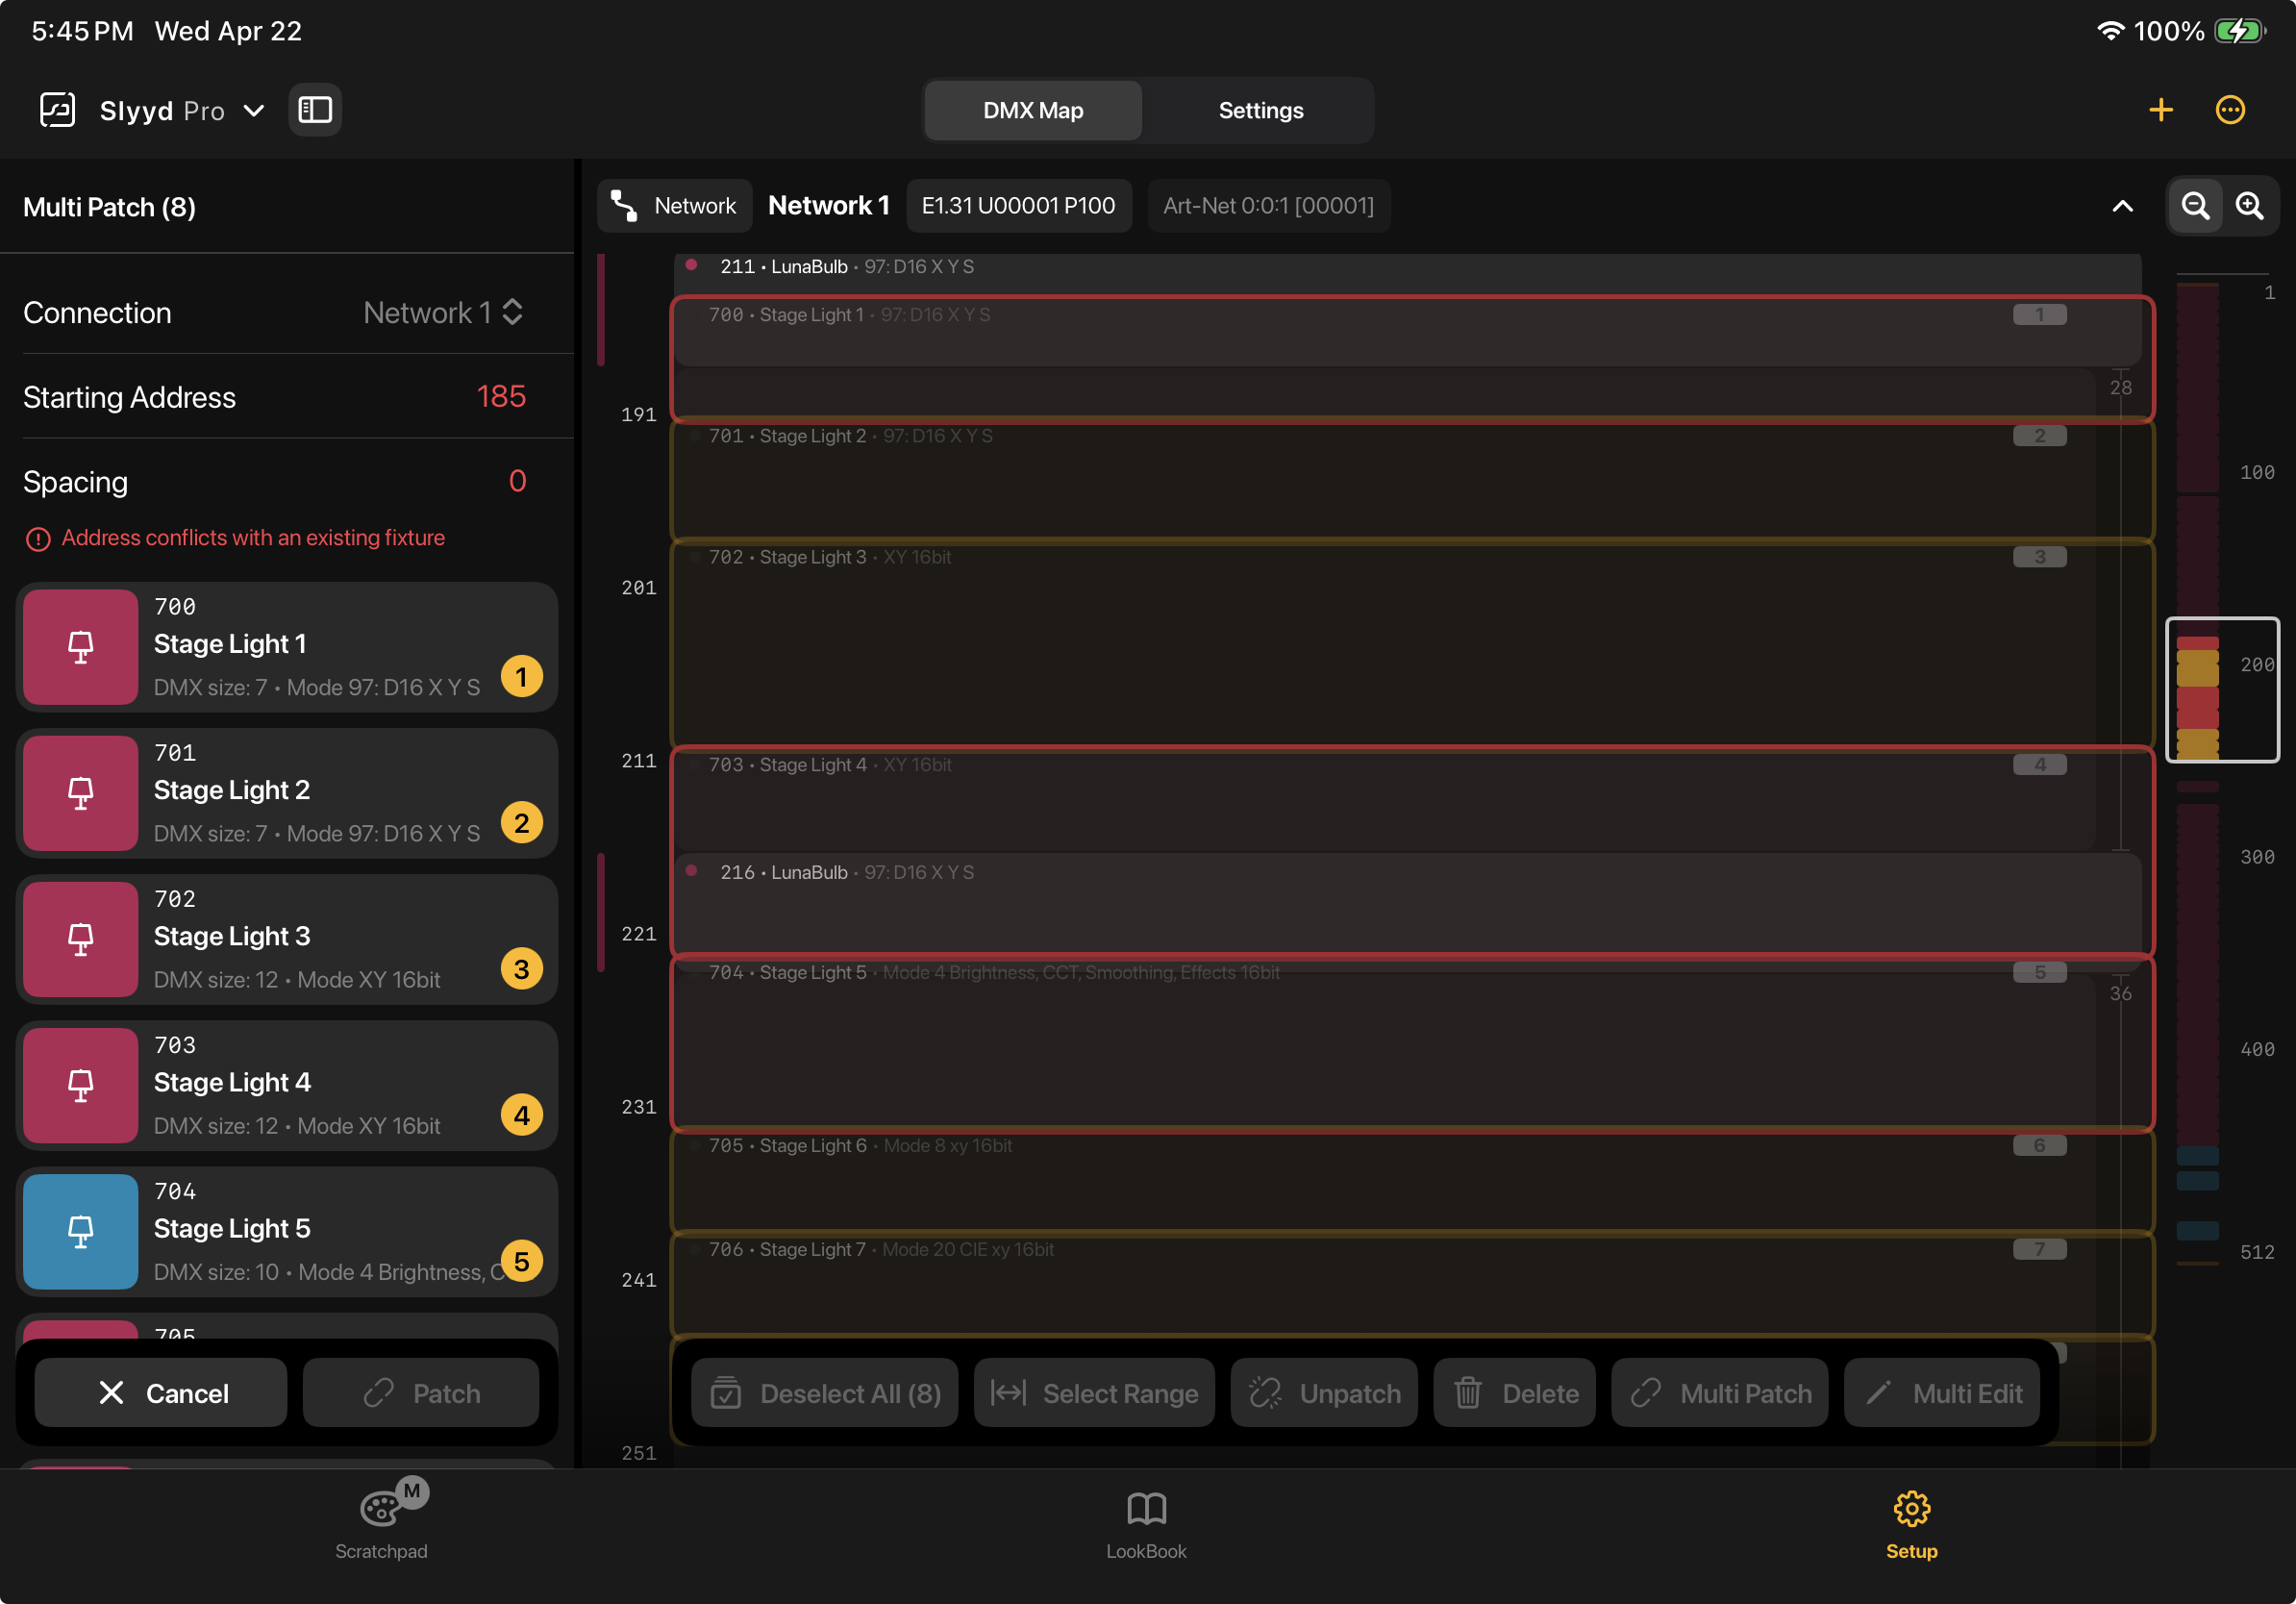
When using Multi Patch, Yellow shadows appear on the DMX Map, indicating where the fixtures will be patched once 'Patch' is pressed. If the selected location already contains a patched fixture, the shadows will be red in the offending locations.
Adding and Patching New Fixtures
To add new fixtures to a project, press the + button in the upper right corner of the DMX Map. The + button brings up the Add Fixtures screen.
Add Fixtures Screen
A list of manufacturers lives on the left side of the Add Fixtures screen. Tapping the manufacturer reveals a list of fixtures. Tapping on the desired fixture brings up a list of available profiles for the fixture to the right, which are sorted by firmware version (when available). Only Recommended profiles are shown by default. To show all available profiles, tap the ‘Show all profiles’ text. To search for a profile or for a fixture, drag the respective list down to expose the search field at the top.
Choose the number of fixtures to add to a project by tapping the + or - buttons on the right side of the profile, or by entering a value in the text field. Fixtures with different profiles, models, and manufacturers can be added at the same time by setting quantities on different profiles. Press the “Next” button in the upper right corner after the desired quantities are entered, which opens the Setup Fixtures screen.

Setup Fixtures Screen
The Setup Fixtures screen lists all the profiles selected on the Add Fixtures screen individually. When desired, the default names, Fixture IDs, and icons can be adjusted before the fixtures are patched into a project.
The Multi Edit row at the top of the screen can be used to quickly make changes to multiple fixtures. These changes follow the selection order. Selection order is displayed as a yellow circle with a number inside above the selection checkbox for each fixture. All fixtures can be selected at once using the checkbox next to the Multi Edit row, individually using the checkbox next to each fixture, or by fixture type using the checkbox next to the fixture type header. These checkboxes can be used to deselect fixtures as well.

Using the Multi Edit row to edit fixtures follows the same rules as the Multi Edit panel on the DMX Map:
Name - Sets all selected fixtures to the newly input name. If the name includes a number that's not touching any letters, that number becomes tokenized after pressing return. The tokenized number increases by 1 for each selected fixture, following the selection order. If the name includes more than one number, only the number furthest to the right is tokenized. Tapping the 'x' on the tokenized number dismisses the tokenization, and instead applies the same number to all selected fixtures.
Fixture ID - Sequentially updates the Fixture ID of all selected fixtures, with the first fixture in the selection order receiving the new ID, the second fixture receiving the new ID + 1, and so on.
Icon - Sets all selected fixtures to the selected icon.
Delete - Deletes all selected fixtures.
After the desired changes are made, the fixtures need to be added to the project using either the 'Multi Patch' or 'Add Manually options in the top right of the Setup Fixtures screen.
Multi Patch - Tapping 'Multi Patch' brings up the Multi Patch panel and adds the new fixtures, ordered by Fixture ID. The new fixtures will be patched sequentially in this order, in the chosen Connection, starting at the chosen starting address. By default, the lowest Connection and starting address that can fit the new fixtures is chosen, but these fields can be adjusted. A spacing value can also be given, that inserts the chosen amount of empty addresses between each fixture.- When using Multi Patch, Yellow shadows appear on the DMX Map, indicating where the fixtures will be patched once 'Patch' is pressed. If the selected location already contains a patched fixture, the shadows will be red in the offending locations

Add Manually - Moves all fixtures on the Setup Fixtures screen to the Unpatched panel, where they can either by patched one by one by dragging and dropping onto the DMX Map, or by using 'Multi Edit' from the action bar at a later time.
